A Better Understanding of Taps.
What is a tap?
A tap is a device that control the flow of a fluid or gas out of a pipe or container.
Basic functioning of a tap?
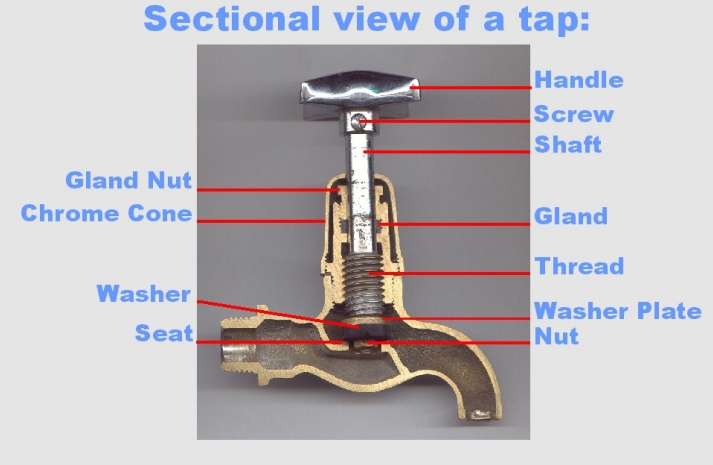
- A shaft that moves up and down, by means of a thread, by turning a handle and forcing a washer on to a
seat. The fluid will be cut of effectively if the washer seals tightly on the seat.
- If the washer is damaged, a leakage of the fluid or gas will be experienced according to the
amount of damage to the washer.
- Likewise, if the seat is damaged, the washer will not be able to seal of properly; the
symptoms will be the same as when the washer is damaged.
Replacing tap washers.
Good Examples of Bad Washers
Involves nine easy steps:
- The right size tap washer.
- Tools for replacing the tap washer.
- Turning off the water supply.
- Opening of lowest tap.
- Taking of the tap head part.
- Replacing the actual washer.
- Inspecting of tap seat.
- Putting back of head part.
- Opening water supply.
- The right size tap washer. The first step in the successful replacement of a tap
washer will be to have the correct size at hand. In general there are only three sizes
available.
The three tap sizes.
- Light Pattern tap 15mm - Small washer.
- Heavy Pattern tap 15mm - Medium washer.
- Heavy Pattern tap 20mm - Large washer.
For the experienced eye it is easy to distinguish between the different sizes. When purchasing the
washers and you are uncertain of what to buy, rather buy one of each. The washers are cheap
enough especially if you take in to consideration the cost and effort to go and get the right size
washer later.
Back
- Tools for replacing the tap washer.
- Small flat screwdriver.
- Medium size shifting spanner.
- Water pump pliers.
- Old rag.
Have a look at the tools.
Back
- Turning off the water supply. To make it possible to replace
the tap washer you will need to turn off the water supply. The best place for doing so is at the
water meter.
Back
- Opening of lowest tap. Now that the water supply is turned off
you want to drop the water pressure in the water system. To achieve this, you need to open a tap.
The best tap to open will be one at the lowest point possible. This will prevent water from running
out where you want to work. The most suitable tap for this will be the cold water
tap at a bath. Not alone is it one of the lowest taps but it helps to prevent spilling water over
a small basin rim. Especially when you switch on the water supply again and the air in the taps start
to "shoot" out with some water. It should only run for a short while. (Should it keep on running
and hot water starts to flow from the cold water tap, make sure to switch off the power supply to
the water heater. Hot water flowing from a cold water tap with the water supply switched off means
that the water is draining from the water heater. With the power still on to the water heater it
means that the element could burn out. The element should always be submerged under water if there
is a power supply to it. You certainly don't want to start replacing heater elements when you just
want to replace a tap washer.)
Back
- Taking of the tap head part.
- Open the specific tap of which the washer needs replacing.
The tap should always be opened when you take the head part off.
- Bath or basin plug.
As soon as the water has stopped running here, plug the waste where you want to replace the
washer. This will prevent any small screws form landing up in the drain.
- Loosening the handle screw.
This is where you will need the small flat screwdriver. At the side of the tap handle you will
find a small screw. Unscrew it and take it out. You will be surprised to find how easily it can
drop out of your hands. Now you know why it is so important to plug the waste.
- Taking of the handle.
The tap handle is sometimes very difficult to remove. A very practical way of removing it is
to take a shifting spanner. Set it to fit around the shaft below the handle. Now you can wedge it
up and down. You will find that the extra leverage will aid in removing the handle in no time.
- Taking off of the chrome cone.
The chrome cone acts as decoration so that the less aesthetical parts of the tap is out of sight.
Sometimes this is also difficult to remove. Lime build up, together with soapy residue, tends to
clog together. This sets to form a substance so hard that you will find it very hard to remove the
cone. With the water pump pliers you can grip the cone more effectively. Place the old rag between
the pliers and the cone. This will prevent tool scratches on the chrome finish of the cone. Turn Anti-clock wise.
Sometimes it is also necessary to give it a light tap with the screwdrivers handle to break the residues hold on the cone's threads.
- Taking the head part off.
Now that the cone is removed you can use the shifting spanner to turn the head part off. Grip
it at the nut and turn. Remember, anti-clock wise.
Back
- Replacing the actual washer. Now that you have the head part in
your hands you can see the tap washer. Usually it is black in colour. A small brass nut will
hold it to the washer plate. With the shifting spanner you can remove the nut, you might find it
necessary to grip the washer plate with the water pump pliers. You might notice that the old washer
is bigger than the new one. This is due to the washer being worn out because of all the pressure
it used to sustain. The new washer should be the same size as the washer plate. Now you can tighten
the washer with the nut to the washer plate. Back
- Inspecting of tap seat. Before replacing the head part, the tap seat
should be checked where the washer needs to seal. Should the seat be damaged it will need to be
reseated. Damage to the seat can be noted as small recesses or marks on the seat. The washer will
not be able to press into the recesses. The result will be a dripping tap even though the washer
was replaced. The reseating of the seat is discussed in full later on. Back
- Putting back of head part. At this stage the head part can be put
back as outlined in step 5 above, following the steps from the bottom up. Just double check
that the head part is still in the open position. This will prevent the new washer from getting
damaged, even the washer plate could brake if this is not done. Back
- Opening water supply. Now you are ready to open the water supply.
First make sure that the tap that you have worked on is closed. Then close the baths tap that was
opened to release the pressure. Now you can open the main water supply. After this you should
first re-open the baths cold water tap and then the hot water tap. By doing this you should get rid of
any air trapped in the system. This is very important. If not the air that is trapped in the system
can break glassware in sinks when it shoots out at a force propelled by the water. When you are
sure that all air is out of the system you can open the other taps with great caution. To release
the last bit of air in these areas.
Back


Adjusting the Gland nut.
What is the gland nut?
Water that is passing the shafts nut is prevented from leaking by the
gland nut which is pressing the gland to the taps shaft.
As a result of the back pressure when a tap is opened, water will leak pass
the gland. This problem is very common amongst garden taps, and taps with
washing machine connections. Due to a higher back pressure of the water when
the tap is in the open position. When the gland nut presses the gland against the shaft
the water will not leak.
The gland is made out of asbestos fibre and graphite and acts as an excellent seal. When a leak
occurs it can be solved by adjusting the gland nut. When the nut is adjusted at it's fullest
and the gland is still leaking it can be fixed on the following manner.
Unscrew the nut completely, then slide it up the shaft. Now you can apply a few threads of
hemp in a
anti clock wise manner to the shaft just above the gland. Slide the nut back and start to tighten it.
By opening the tap every so often while tightening the nut, you can actually test if it is still
leaking. Keep on adjusting the nut till the leak stops. Avoid over tightening. As this will result
in a very hard to open tap. Sometimes it can even result in not being able to turn the handle to
open the tap at all.
Reseating the Seat
As pointed out already, the taps seat is playing a very important role in the effectiveness of a
tap. It often happens that taps still leaks after a tap washer is replaced.
With closer investigation one will find that the seat is damaged and causes the leaking of
the tap and not the tap washers. It is easy to forget to check the seat for damage.
Many factors can result in the damaging of the seat. Some water compositions have a very bad
reaction against some metals. The seat can get damaged by the waters composition. Other
times an object can get stuck on the washer that will in turn damage the seat.
By using a tap reseating tool, the seat can be reseated in such a manner that it will be as
good as new in most of the instances.
Back
How does the tap reseater work?
After removing of the tap head part and diagnosing a damaged tap seat it must be reseated. The
tap reseater gets turned into the tap where the head part came out. It also has a shaft and a
handle but instead of a tap washer it has a round flat cutting bit. This bit can be replaced
by different bits sizes
according to the seat size. By applying pressure to the handle and turning it in a clock wise direction it cuts into the seat. Caution should be
taken not to apply to much pressure. This can result in damaging the seat beyond repair.
By inspecting the seat often after turning the reseater handle a few times, one can determine
how much more you need to cut the seat. Some seats may be damaged in such a degree that it may
take quite some time to get it reseated again. In average it is a task that does not take too long.
After reseating the seat the reseating tool can be removed and the new washer can be installed on
the washer plate. Now the head part can be replaced and the tap should be as good as new.
Take a look at the tap reseating tool.
Take a look at a tap reseating tool in a tap.
Hemp
Hemp is a natural fibre made out of the hessian plant. It is pleated and looks like threads of hairy wool.
It is used by plumbers on all threads that need to be water tight. Being a natural fibre it is excellent in
acting as a sealer against water leaks. Now a days there are all kinds of sealers available that does
the same work. eg. PTFE tape. The use of hemp is still very popular because it is both effective and cost effective.
Take a look at what hemp
looks like, and how it is applied on a thread.
Back
Other general tap headaches.
- Taps that are difficult to open.
- Taps that causes water hammer action in pipes.
- Noisy taps.
- Tap with stripped head parts.
- Washers that get stuck on the seat.
|